Normal Maps Explained: How They Fake Detail and Stop Breaking in Unity
You spent two days sculpting a face with four million polygons. It looks incredible in your sculpting app. Then you drop it into your game and the frame rate falls off a cliff, because no real-time engine wants to push four million triangles for a single head. This is the exact problem normal maps were invented to solve, and it is why almost every surface you have ever seen in a modern game is faking its detail.
If you have ever wondered why your character looks flat, why a wall caves inward when it should bulge out, or why a perfectly good texture from one marketplace looks wrong in Unity, the answer is almost always normal maps. Here is what they actually are and how to stop breaking them.
What a normal map actually is
A normal map is a texture, but it does not store color. It stores direction. Every pixel encodes which way the surface is pointing at that spot, packed into the red, green, and blue channels as the X, Y, and Z of a vector. Red is left-right, green is up-down, blue is the amount the surface faces straight out toward the camera.
That is why a normal map looks like that flat purple-blue sheet. Most of a flat surface points straight out, and "straight out" encodes to a bluish-purple color. The red and green wobble away from that baseline wherever there is a bump, a crease, or a pore.
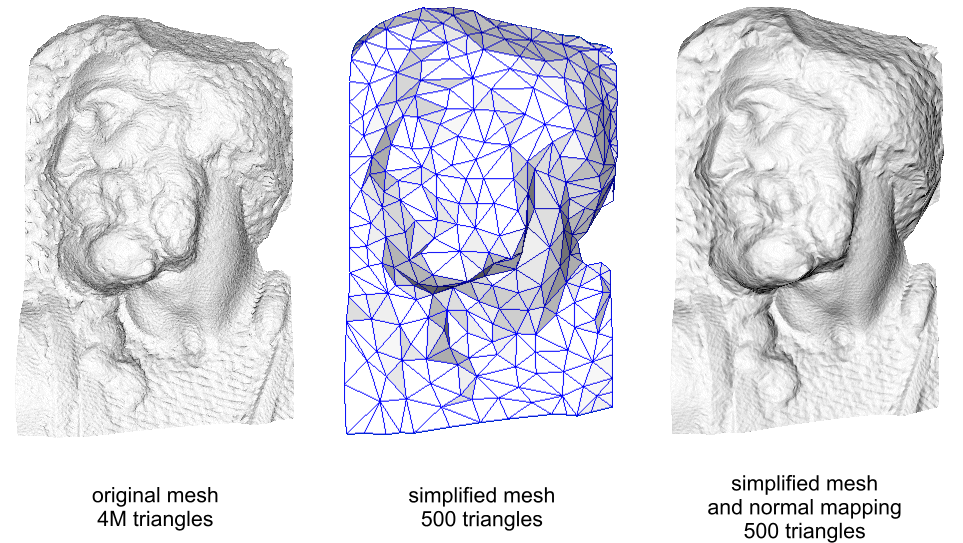
When light hits the model, the shader reads each pixel of the normal map and lies to the lighting calculation about which way the surface faces. The geometry stays flat and cheap, but the light reacts as if there were real bumps there. The classic example below shows the same head as a dense high-poly mesh, a low-poly version, and the low-poly version wearing a baked normal map. The third one is what ships.
Detail from a high-poly mesh baked onto a low-poly one. Credit: Paolo Cignoni, Wikimedia Commons.

Normal map, bump map, height map: not the same thing
People throw these terms around like they are interchangeable. They are not.
A bump map (or height map) is grayscale. It stores one number per pixel: how high or low this spot sits. White is up, black is down. It is simple and it works, but it only knows altitude, not which direction a slope faces, so it tends to fall apart at grazing angles.
A normal map is RGB and stores the full surface direction, which is far more information. That is why it holds up under moving light and animation where a plain bump map would smear. A height map can still ride along inside the alpha or blue-derived channel for effects like parallax, but the normal map is doing the heavy lifting.
There is also a split between tangent space and object space normal maps. Tangent space maps are the mostly-purple ones, and they are what you want for anything that deforms or animates, like characters, because the encoded directions are relative to the surface rather than to the world. Object space maps are more colorful and lock detail to a fixed orientation, which suits rigid props but breaks on a bending arm.
The gotcha that eats an afternoon: DirectX vs OpenGL
Here is the one that gets everybody. There are two conventions for normal maps, and they disagree about which way "up" is in the green channel. DirectX wants green pointing down (Y-). OpenGL wants green pointing up (Y+). The maps look almost identical to your eye, but the green channel is literally inverted between them.
If your normal map makes dents where there should be bumps, you are not cursed. You loaded a DirectX map into a tool expecting OpenGL, and the green channel needs flipping.
This matters in Unity because Unity expects OpenGL-style normal maps. So do Godot, Blender, and Substance Painter's default export. Unreal Engine, on the other hand, lives in the DirectX camp. So when you grab a texture pack built for Unreal, or pull one from a marketplace that does not label its format, and it looks inside-out in Unity, you are almost certainly staring at a DirectX map with the wrong green channel.
The fix is to flip the green channel. You can do it in your image editor by inverting only the green channel, or bake it in the correct convention in the first place. When you are buying assets, a good listing tells you which format ships. On marketplaces like DevLoot the format is part of the spec, and that one line saves you the inside-out scavenger hunt later.
Importing into Unity without breaking it
The mistakes here are boring and common, so run the checklist.
First, set the Texture Type to Normal map in the import settings. If you leave it on Default, Unity treats the file as plain color data, applies the wrong color space, and your lighting goes subtly wrong in a way that is hard to diagnose.
Second, leave Create from Grayscale unchecked unless you actually imported a grayscale height map by mistake. That option converts a black-and-white bump into a normal map. If your file is already the blue-purple normal, checking it will mangle the result.
Third, understand that a normal map is linear data, not sRGB color, and the Normal map texture type already handles that for you. This is the whole reason the texture type toggle exists, so do not try to outsmart it by forcing sRGB settings.
A Shader Graph note
If you build materials in Shader Graph, the Sample Texture 2D node set to type Normal will handle the platform flip for you based on your build target. That is convenient, but it is also why a map can look correct in one project and wrong in another. The node is doing work you cannot see, so when something looks off, confirm the source convention before you start blaming the shader.
Where normal maps stop working
Normal maps fake the lighting, not the shape. That distinction is everything. The silhouette of your model does not change, so a normal-mapped brick wall still has a razor-flat edge when you look along it. Deep detail viewed from a shallow angle reveals the lie, because the surface is not actually displaced.
The comparison below makes the limit obvious: the lighting reads as bumpy, but the outline is still dead flat.
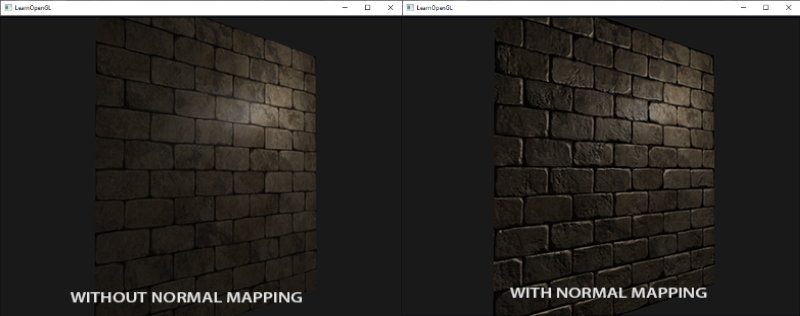
Same flat quad, with and without a normal map. Credit: LearnOpenGL.
When you genuinely need the silhouette to change, that is the job of displacement or tessellation, which actually move geometry and cost a lot more. Parallax occlusion mapping sits in between, shifting the texture to fake depth without new polygons, at a moderate shader cost. Most of the time, a normal map plus a sane polygon budget is the right call, which ties straight into the broader Unity performance conversation.
The honest workflow
The clean way to get a normal map is to bake one: build the detail on a high-poly mesh, then transfer it onto a low-poly mesh as a texture. The two big failure points are smoothing and mirroring. If your low-poly smoothing groups and your baking cage do not agree, you get ugly gradients and seams. If you mirror UVs to save texture space, tangent-space normals can flip on the mirrored side, so plan for it rather than discovering it at the end.
If you are buying instead of baking, this is part of what people mean by "game-ready." A real game-ready asset ships a correctly baked normal map in a stated format with matching smoothing, not just a pretty render. It is worth knowing exactly what game-ready actually means before you pay, because a bad normal bake is the kind of thing that quietly costs you a day.
Normal maps are not magic and they are not new, but they are the single trick holding up most of what looks good in real-time. Understand the green channel, respect the import settings, and know where the illusion ends. Do that and you stop fighting your textures and start using them.